BRAND NEW
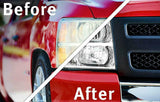
Most headlight lenses are made of polycarbonate-based materials which tend to oxidise over time, leading to reduced visibility. Hazy yellow headlights can be a safety risk and potentially lead to MOT failure. Current solutions to headlight cleaning are often complicated and require tools, time and effort. But with Armor All® Headlight Restorer Wipes Kit, all you need is 2 wipes and 10 minutes to restore your headlights like new.
No need for any sandpaper or tools
One kit cleans two front headlights
Only 2 easy steps required
Step 1 Clean Wipe removes oxidation
Step 2 Protect Wipe seals the headlight with UV protection coating
WHERE TO USE
Armor All® Headlight Restorer Wipes Kit is suitable to use on polycarbonate headlights.
NB: Please note that this product is not intended for heavily oxidised headlights which may require more abrasive methods. The Headlight Restorer wipes are not designed to tackle damaged and scratched headlights.
USAGE DIRECTIONS
NB: PRODUCT IS ONLY SUITABLE FOR HEADLIGHTS MADE OF POLYCARBONATE.
STEP 1: Oxidation Removal Wipe
NOTE: Wipe will evaporate very quickly. Do not open wipe until you are ready to restore a headlight, and work very quickly while wiping. Active ingredients will evaporate within 3–5 minutes after opening pouch. Park car in a cool, shady location before treating.
AVOID CONTACT WITH PAINTED SURFACES: Use painter’s tape to protect painted surfaces surrounding headlight.
1. Ensure headlight is clean and dry.
2. Open a “STEP 1 CLEAN” sachet and remove wipe. Keep wipe folded to reduce evaporation.
3. Scrub headlight with firm, even pressure in a horizontal back-and-forth motion. You will notice the oxidation residue beginning to be removed.
4. Turn the wipe to a clean side, keeping the wipe folded.
5. Continue to wipe, turning wipe to clean section as needed until no residue is visible on wipe. Discard wipe.
NOTE: Though your headlight may appear clear additional deep cleaning could be necessary to ensure all oxidation is removed.
6. Repeat 1–5 on the other headlight.
STEP 2: UV Sealant Protection Wipe
1. Ensure that both headlights have been cleaned with the Oxidation Removal Wipe and that surface is dry before applying sealant. For best results, first wipe surface with a clean, lint-free towel.
2. Open a “STEP 2 PROTECT” sachet and pull out wipe.
3. Apply to the headlight surface by wiping in one direction, similar to applying a coat of paint. Repeat on second headlight. One wipe should coat two headlights.
4. Let surface dry completely. Surface will be dry to touch in about 3 hrs. Do not touch surface and avoid contact with water until dry.
NOTE: Drying time after step 3 is dependent upon weather conditions. Drying may take longer in lower temperatures or higher humidity.
NOTE: Not for personal cleansing. Dispose of the wipes in bin. Do not flush
ATTENTION
Armor All® Headlight Restorer Wipes kit is only suitable for headlights made of polycarbonate. Avoid contact with painted surfaces. Use painter's tape to protect painted surfaces surrounding headlight. Not for personal cleansing. Dispose of the wipes in bin. Do not flush.
FOR BEST RESULTS
Park car in a cool, shady location before treating. It is important to clean both headlights with the Step 1 Clean Wipes prior to opening the Step 2 Protect Wipe and treating the headlights.
NEED A SERVICE KIT FOR YOUR CAR VAN LCV
SEND US YOUR REG AND WE'LL MAKE YOU A KIT
 AND THEN SEND YOU THE ITEM NUMBER VIA EBAY


